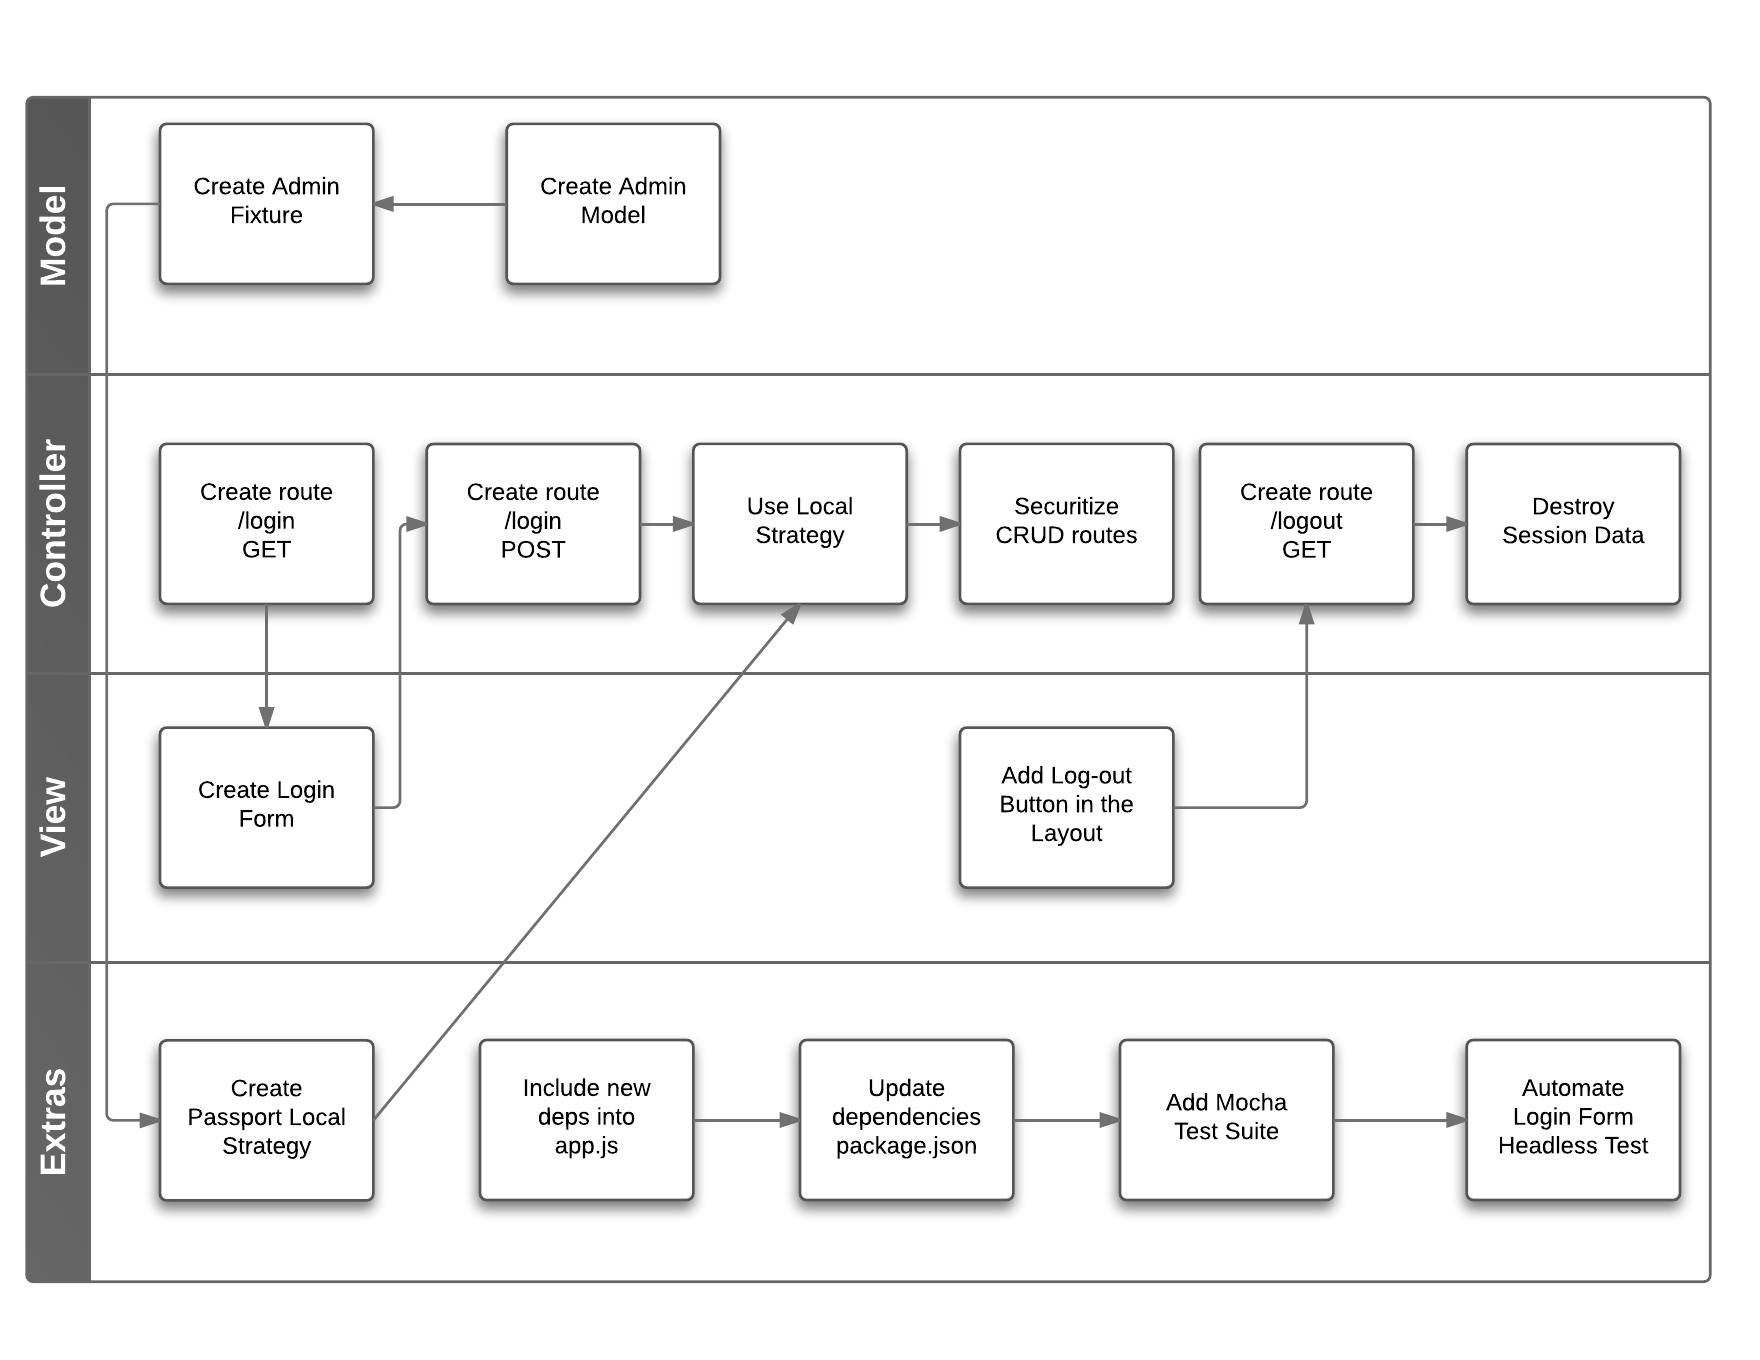
Auth Layer with Express and Passport Local
Express 4.x and Passport Auth Layer
We are assuming that you already completed the CRUD tutorial. The main application has this urls:
| URL | Method | Description |
|---|---|---|
| /list | GET | List all persons |
| /p/new | GET | Displays creation form |
| /p/new | POST | Handles persons creation |
| /p/delete/:id | GET | Delete records |
| /p/edit/:id | GET | Display edit form |
| /p/edit/:id | POST | Edit persons information |
Now we want to add a local authentication layer to protect the listed urls. We are creating an administrator role, that’ll access the private urls via login in a new url called /login. Let’s enumerate a list of tasks we do need to accomplish for this to happen:
- Create Admin model. (Model:
./models/admin.js) - Add an admin fixture, to be preloaded when server starts. (Credentials: admin@admin.com:123456)
- Create
/loginroute. (Route:./routes/main.js) - Create a login form. (View:
./views/login.jade) - Create Passport Local Strategy
- Handle login form via POST to
/login. (Route:./routes/main.js) - Use Local Strategy
- Securitize CRUD routes (Route:
./routes/main.js) - Create Logout route (Route:
./routes/main.js) - Destroy Session Data
- Add Sign-off button into the layout
Create Admin Model
Let’s create a basic model ./models/admins.js with basic credentials fields like so:
var mongoose = require('mongoose');
var Schema = mongoose.Schema;

var adminSchema = new Schema({
    email: String,
    password: String
});

var adminModel = mongoose.model('Admins', adminSchema);

module.exports = adminModel;
So we have the basic model, let’s create a basic test test/admins-test.js:
var Admin = require('../models/admins');
var mongoose = require('mongoose');

mongoose.connect('mongodb://localhost/crudtest');

var a = new Admin({ email:"admin@admin.com", password: "123456" });
a.save(function(err, doc){
    console.log(err, doc);
});
If we run this, we’ll create an admin.
$ node test/admins-test.js
null { __v: 0,
  email: 'admin@admin.com',
  password: '123456',
  _id: 546fe06f0aff37711bb5a517 }
Something is really bad here. Did you noticed? We are storing a plain password, that’s not good let’s improve our model a little bit:
var mongoose = require('mongoose');
var Schema = mongoose.Schema;
+var crypto = require('crypto');

var adminSchema = new Schema({
    email: String,
    password: String
});

+/**
+ * Pre-Save Hook
+ * http://mongoosejs.com/docs/api.html#schema_Schema-pre
+ */
+
+adminSchema.pre("save", function(next) {
+    if(this.isModified('password'))
+        this.password = crypto.createHash('md5').update(this.password).digest("hex");
+    next();
+});

var adminModel = mongoose.model('Admins', adminSchema);

module.exports = adminModel;
We just added the crypto module to use the MD5 hash creation method, we are also adding functionallity to add a pre-save hook to our schema definition.
$ node test/admins-test.js
null { __v: 0,
  email: 'admin@admin.com',
  password: 'e10adc3949ba59abbe56e057f20f883e',
  _id: 546fed1f3561b0641e4eb34b }
As we can see now if password is modified we automatically turn that into a MD5 hash. Let’s create and authentication method so each admin can test passwords.
var mongoose = require('mongoose');
var Schema = mongoose.Schema;
var crypto = require('crypto');

var adminSchema = new Schema({
    email: String,
    password: String
});

/**
 * Pre-Save Hook
 * http://mongoosejs.com/docs/api.html#schema_Schema-pre
 */

adminSchema.pre("save", function(next) {
    if(this.isModified('password'))
        this.password = crypto.createHash('md5').update(this.password).digest("hex");
    next();
});
+
+adminSchema.method('authenticate', function(password) {
+    return crypto.createHash('md5').update(password).digest("hex") === this.password;
+});

var adminModel = mongoose.model('Admins', adminSchema);

module.exports = adminModel;
And we can test it by modifying our test ./test/admins-test.js.
var Admin = require('../models/admins');
var mongoose = require('mongoose');

mongoose.connect('mongodb://localhost/crudtest');

var a = new Admin({ email:"admin@admin.com", password: "123456" });
a.save(function(err, doc){
    console.log(err, doc);
+
+    console.log("PasswordOK", a.authenticate("123456"));
+    console.log("PasswordFAIL", a.authenticate("incorrect"));
});
We can test again our method to see if it works:
$ node test/admins-test.js
null { __v: 0,
  email: 'admin@admin.com',
  password: 'e10adc3949ba59abbe56e057f20f883e',
  _id: 546ff176b6c3be1a20c3a734 }
PasswordOK true
PasswordFAIL false
That’s it! we have our admin model ready.
Adding Fixtures
Fixtures a data-sets we store in our programming language and sync them with the DB when necessary. They are important specially when running tests, or if you don’t want to show your webapp empty. In this example, we are going to use mongoose-fixtures to pre-load persons and admins everytime we start the server.
$ npm install --save mongoose-fixtures
Let’s create a folder to store our fixtures.
$ mkdir fixtures
Let’s create a file to store persons personal data fixtures/persons.js:
exports.Persons = [
    { name: 'Cristian', age: 27 },
    { name: 'Maria', age: 22 },
    { name: 'Ignacio', age: 32 }
];
We do need to add the new package into our app.js
var express = require('express');
var path = require('path');
var favicon = require('serve-favicon');
var logger = require('morgan');
var cookieParser = require('cookie-parser');
var bodyParser = require('body-parser');
var session = require('express-session')
var flash = require('connect-flash');

var routes = require('./routes/index');
var users = require('./routes/user');

var mongoose = require('mongoose');
+var fixtures = require('mongoose-fixtures');

mongoose.connect('mongodb://localhost/crudtest');
+
+fixtures.load('./fixtures/persons.js');

var app = exports.app = express();
....
If we run the server again:
$ npm start
And go to http://localhost:3000/list:
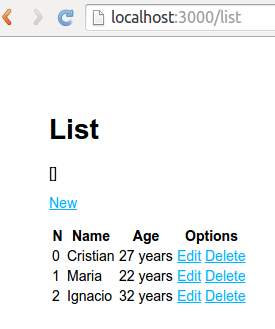
As you can see persons fixtures have been preloaded, also notice that everytime you restart the server mongoose-fixtures will empty your collections and fill them with specified datasets. Try adding and/or removing and restarting the server.
Let’s do the same with the admins so we can have at least one administrator available to do our implementation. Add fixtures/admins.js file:
exports.Admins = [
    { email: 'admin@admin.com', password: '123456' }
];
And do the following changes into app.js
var express = require('express');
var path = require('path');
var favicon = require('serve-favicon');
var logger = require('morgan');
var cookieParser = require('cookie-parser');
var bodyParser = require('body-parser');
var session = require('express-session')
var flash = require('connect-flash');

var routes = require('./routes/index');
var users = require('./routes/user');

var mongoose = require('mongoose');
var fixtures = require('mongoose-fixtures');

mongoose.connect('mongodb://localhost/crudtest');

+fixtures.load('./fixtures/admins.js');
fixtures.load('./fixtures/persons.js');
Include the model inside ./routes/main.js:
var app = module.parent.exports.app;
var Persons = require('../models/persons.js');
+var Admins = require('../models/admins.js');

app.get('/list', function(req, res){
    var msg = req.flash('message');
    Persons.find({}, function(err, docs){
        res.render('list', { title: 'List', persons: docs, flashmsg: msg});
    });
});
.....
Congrats! We succesfully added fixtures into our app.
Login Form
Let’s create our login form.
To begin, we need to add the /login route, into our ./routes/main.js:
var app = module.parent.exports.app;
var Persons = require('../models/persons.js');
var Admins = require('../models/admins.js');

+app.get('/login', function(req, res){
+    res.render('login', { title: 'Login'});
+});
+
app.get('/list', function(req, res){
    var msg = req.flash('message');
Secondlly, we do create the view file ./views/login.jade:
extends layout

block content
  h1= title
  form(action='/login',method='post')
    div
      label(for='email') E-mail:
      input(type='text', name='email', id='email', placeholder='E-mail here...')
    div
      label(for='password') Pasword:
      input(type='password', name='password', id='password', placeholder='Password...')
    div
      input(type='submit', value='Login')
  style.
    form label { min-width: 80px; display: inline-block; }
    form > div { padding: 5px; }
Finally we do set the POST url /login to receive the login form data, for now we add just a mock to catch and display data received. So we do add the following into ./routes/main.js:
var app = module.parent.exports.app;
var Persons = require('../models/persons.js');
var Admins = require('../models/admins.js');

app.get('/login', function(req, res){
    res.render('login', { title: 'Login'});
});

+app.post('/login', function(req, res){
+    res.json(req.body);
+});
+
app.get('/list', function(req, res){
    var msg = req.flash('message');
    Persons.find({}, function(err, docs){
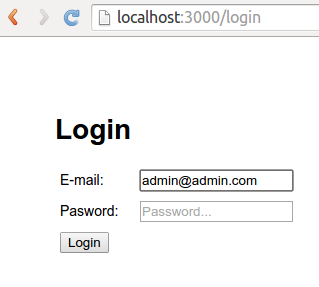
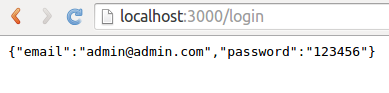
To test all that you can simply go to http://localhost:3000/login, and by submitting data you should be able to get the data inserted back. Don’t you worry, just go ahead with next step we’ll get back to this POST url later.
Passport
Passport is authentication middleware for Node.js, that works really well with Express, see http://passportjs.org/. Passport let you define strategies, for this project we’ll need Passport core, and passport-local package. So let’s install them:
$ npm install --save passport passport-local
Let’s move on linking passport to our express webapp, in the app.js head we require passport:
var express = require('express');
var path = require('path');
var favicon = require('serve-favicon');
var logger = require('morgan');
var cookieParser = require('cookie-parser');
var bodyParser = require('body-parser');
var session = require('express-session')
var flash = require('connect-flash');
+var passport = exports.passport = require('passport');
And then around line 33, we include the following:
 app.use(bodyParser.urlencoded({
 app.use(cookieParser());
 app.use(express.static(path.join(__dirname, 'public')));
 app.use(session({secret: 'supersecret', saveUninitialized: true, resave: true}));
+app.use(passport.initialize());
+app.use(passport.session());
 app.use(flash());

+require('./auth/local-strategy.js');
+
In that way we let express now we are using passport, notice we are also linking a file with the Local Strategy definition.
Let’s create a folder called auth:
$ mkdir auth
And create a file to store our local passport strategy, call it ./auth/local-strategy.js:
var passport = module.parent.exports.passport,
  LocalStrategy = require('passport-local').Strategy,
  Admins = require('../models/admins.js');

passport.serializeUser(function(user, done) {
  done(null, user);
});

passport.deserializeUser(function(user, done) {
  done(null, user);
});

passport.use('AdminLogin', new LocalStrategy(
  {
    usernameField: 'email',
    passwordField: 'password'
  },
  function(username, password, done) {
    Admins.findOne({ email:username }, function(err, adm) {
      if (err) { return done(err); }
      if (!adm) {
        return done(null, false, { message: 'Incorrect username.' });
      }
      if (!adm.authenticate(password)) {
        return done(null, false, { message: 'Incorrect password.' });
      }
      return done(null, adm);
    });
  }
));
That’s it! Our strategy is alredy defined! It’s time for us to use it, just by changing the /login POST route definition in ./routes/main.js:
var app = module.parent.exports.app;
+var passport = module.parent.exports.passport;
var Persons = require('../models/persons.js');
var Admins = require('../models/admins.js');

app.get('/login', function(req, res){
    res.render('login', { title: 'Login'});
});

+app.post('/login', passport.authenticate('AdminLogin',
+    { successRedirect: '/list',
+      failureRedirect: '/login',
+      failureFlash: true }));

app.get('/list', function(req, res){
    var msg = req.flash('message');
    Persons.find({}, function(err, docs){
        res.render('list', { title: 'List', persons: docs, flashmsg: msg});
    });
});
That’s how we are informing the route which strategy we are going to use and what should we do in case of success and failure. Now restart the server and go test it! http://localhost:3000/login
If you enter admin@admin.com : 123456 credentials you should be redirected to /list. If we enter wrong credentials, we should stay in http://localhost:3000/login.
Headless Test
It’s possible to automate the kind of test mentioned before. Let’s make our requirements turn to live. Let’s create a couple of tests to probe the following:
Success Test
1. Go to http://localhost:3000/login
2. Insert email: admin@admin.com and password: 123456
3. Expected result: you should be redirected to http://localhost:3000/panel
Failure Test
1. Go to http://localhost:3000/login
2. Insert email: admin@admin.com and password: incorrect
3. Expected result: you should be redirected to http://localhost:3000/login
For doing that we can use zombie.js that is a lightweight framework for headless testing, that is a browser emulation that runs without a graphic interface (no GUI). To install it, just run:
$ npm install zombie --save-dev
Once installed we can create a file to make a quick test, call it ./test/headless-tests.js:
var Browser = require('zombie');
var assert  = require('assert');

Browser.localhost('localhost', 3000);

// create new browser instance
var browser = Browser.create();

browser.visit('/login', function(err){
    browser
        .fill('email', 'admin@admin.com')
        .fill('password', '123456')
        .pressButton('Login', function(err){
            console.log('Success Test: ', browser.document.location.pathname);
        });
});
In order to run this test, we need to have the webapp up and running in one console and open a second console:
zombie.js test
$ node test/headless-tests.js

Success Test:  /list
Look in the terminal where you are running express, you’ll be able to see zombie.js requests:
express server
$ npm start

> express4crud@0.0.1 start /var/www/express4passport-local
> node ./bin/www

GET /login 200 263.565 ms - 708
POST /login 302 39.529 ms - 66
GET /list 200 35.769 ms - 892
We can do a similar test to probe, the failure case, just go ahead and change the password. And try again:
+ .fill('password', 'incorrect')
We’ll wrap all this test into a single test suite later on.
Securitize Routes
It’ll be good to add some extra validation, to prevent unauthorized users access to the CRUD urls. We can check if exists session data, for authorized users express saves data into req.user. We can create an interceptor method called adminAuth to validate session data in ./routes/main.js:
var app = module.parent.exports.app;
var passport = module.parent.exports.passport;
var Persons = require('../models/persons.js');
var Admins = require('../models/admins.js');

+var adminAuth = function(req, res, next){
+    //authorize role
+    if(typeof req.user != "undefined"){
+        next();
+    }else{
+        //Not authorized redirect
+        res.redirect('/');
+    }
+}
+
app.get('/login', function(req, res){
    res.render('login', { title: 'Login'});
});

app.post('/login', passport.authenticate('AdminLogin',
    { successRedirect: '/list',
      failureRedirect: '/login',
      failureFlash: true }));

+app.get('/list', adminAuth, function(req, res){
    var msg = req.flash('message');
    Persons.find({}, function(err, docs){
        res.render('list', { title: 'List', persons: docs, flashmsg: msg});
    });
});
For each route that we want to securitize we will need to add the adminAuth as second parameter, that’s because route definition nature of express, that let you chain operations:
app.get('/', operation1, operation2, operation3, function(req, res){
    /**
    * If code gets here it means all 3 operations passed and called next()
    */
    res.render('index', { title: 'Express'});
});
Now if you try to access http://localhost:3000/list without being logged-in, you’ll be redirected to home. See you express terminal, and pay special attention to 304 redirects:
$ npm start

> express4crud@0.0.1 start /var/www/express4passport-local
> node ./bin/www

GET / 304 330.696 ms - -
GET /css/style.css 200 4.117 ms - 111
GET /list 302 4.984 ms - 58
GET / 304 37.074 ms - -
GET /css/style.css 200 1.558 ms - 111
GET /list 302 2.479 ms - 58
GET / 304 16.337 ms -
Please securitize all the routes by adding adminAuth as first operation, excepting / and /login.
Destroying Session Data
Once we login there’s no way to logout let’s add a log-out link. For doing that we can start modifying the main layout ./views/layout.jade:
doctype html
html(lang='en')
  head
    meta(charset='UTF-8')
    meta(name='viewport', content='width=device-width')
    title= title
    block css
      link(rel='stylesheet', href='/css/style.css')
    block js
      script(src='http://localhost:35729/livereload.js')
  body
+    -if (user) {
+    ul#menu
+      li Welcome
+        b  #{user.email}
+      li
+        a(href="/logout") Sign-Off
+    style.
+      ul#menu {
+        display:block;
+        list-style: none;
+        position: fixed;
+        top: 0;
+        background: #ccc;
+        margin: 0;
+        left: 0;
+        width: 100%;
+        padding: 10px 20px;
+      }
+      ul#menu li {
+        float: left;
+        padding: 0 10px;
+      }
+    - }
    block content
Just added a menu list and some style. Let’s make a user variable be available for all templates, by adding an interceptor into ./routes/main.js:
var app = module.parent.exports.app;
var passport = module.parent.exports.passport;
var Persons = require('../models/persons.js');
var Admins = require('../models/admins.js');

var adminAuth = function(req, res, next){
    //authorize role
    if(typeof req.user != "undefined"){
        next();
    }else{
        //Not authorized redirect
        res.redirect('/');
    }
}

+app.use(function(req, res, next) {
+    res.locals.user = req.user;
+    next();
+});
+
app.get('/login', function(req, res){
    res.render('login', { title: 'Login'});
});

app.post('/login', passport.authenticate('AdminLogin',
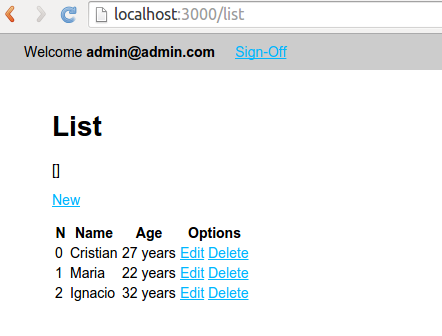
If we restart the server and login again, we’ll be able to see a top bar menu:
Now it’s time to destroy session data. Every time users hit /logout url, we completly disconnect them in ./routes/main.js:
var app = module.parent.exports.app;
var passport = module.parent.exports.passport;
var Persons = require('../models/persons.js');
var Admins = require('../models/admins.js');

var adminAuth = function(req, res, next){
    //authorize role
    if(typeof req.user != "undefined"){
        next();
    }else{
        //Not authorized redirect
        res.redirect('/');
    }
}

app.use(function(req, res, next) {
    res.locals.user = req.user;
    next();
});

app.get('/login', function(req, res){
    res.render('login', { title: 'Login'});
});

app.post('/login', passport.authenticate('AdminLogin',
    { successRedirect: '/list',
      failureRedirect: '/login',
      failureFlash: true }));

+app.get('/logout', function(req, res){
+    req.logout();
+    res.redirect('/');
+});
+
app.get('/list', adminAuth, function(req, res){
    var msg = req.flash('message');
    Persons.find({}, function(err, docs){
        res.render('list', { title: 'List', persons: docs, flashmsg: msg});
    });
});
Well… we are done! If you reach this point it means you successfully completed the authentication layer integration.
Final
If you want to see the complete demo, you can go ahead and clone this repo.
$ git clone git@github.com:cortezcristian/express4passport-local.git
Moving Forward
During the past 2 tutorials we’ve been generating, different kind of tests. It’ll be good to wrap them all inside a test suite with mocha. That’ll be our next tutorial.