Creating a Crud with Express
Step by step guide to create a CRUD with Express 4 and mongoose.
Setup
Install yeoman and express generator
$ sudo npm install -g yo generator-express bower grunt-cli
Generate a new express site, choosing Basic, Jade and Grunt
$ mkdir crudtest && cd crudtest
$ yo express
[?] Select a version to install: (Use arrow keys)
‣ Basic
  MVC
[?] Select a view engine to use: (Use arrow keys)
‣ Jade
  EJS
A folder structure will be automatically generated:
$ tree -L 1
.
├── app.js
├── bin
├── bower.json
├── Gruntfile.js
├── LICENSE
├── node_modules
├── package.json
├── public
├── README.md
├── routes
└── views
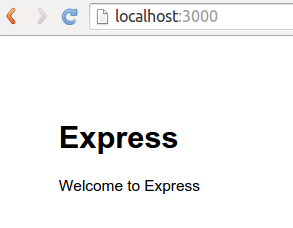
Start the server and browse http://localhost:3000/ to check it’s working:
$ npm start

> express4crud@0.0.1 start /var/www/express4crud
> node ./bin/www

GET / 200 254.744 ms - 305
GET /css/style.css 200 4.750 ms - 111
GET /favicon.ico 404 29.664 ms - 1173
You’ll need to have mongoDB installed in order to continue with this tutorial. Please check that you have it up and running before continuing.
$ mongo
MongoDB shell version: 2.4.11
connecting to: test
>
Adding Models
Installing up mongoose
$ npm install --save mongoose
After that go ahead and modify app.js, add the following lines to set the database connection.
 var routes = require('./routes/index');
 var users = require('./routes/user');

+var mongoose = require('mongoose');
+
+mongoose.connect('mongodb://localhost/crudtest');
+
 var app = express();
We are going to create a folder to store our models:
$ mkdir models
Our first model will look like this models/persons.js:
var mongoose = require('mongoose');
var Schema = mongoose.Schema;

var personSchema = new Schema({
    name: String,
    age: Number
});

var personModel = mongoose.model('Persons', personSchema);

module.exports = personModel;
As you can see it’s a very simple model, we can create a test file to prove it works:
$ mkdir test
Just to create a simple test we can create a file called: test/persons-tests.js with this content:
var Person = require('../models/persons');
var mongoose = require('mongoose');

mongoose.connect('mongodb://localhost/crudtest');

var p = new Person({ name:"Cristian", age:27 });
p.save(function(err, doc){
    console.log(err, doc);
});
If we run it we should be able to see the following
$ node test/persons-tests.js
null { __v: 0,
  name: 'Cristian',
  age: 27,
  _id: 545ed9517520ef9e153a877e }
^C
To validate this we can inspect our Mongo Database directly by doing:
$ mongo
MongoDB shell version: 2.4.11
connecting to: test
> show dbs;
crudtest	0.203125GB
test	0.203125GB
local	0.078125GB
> use crudtest
switched to db crudtest
> show collections
persons
system.indexes
> db.persons.find()
{ "name" : "Cristian", "age" : 27, "_id" : ObjectId("545ed9517520ef9e153a877e"), "__v" : 0 }
> ^C
bye
Modifying Routes
We are going to create a new file routes/main.js and we are going to include it in our app.js file. Right after the express config:
app.use(bodyParser.json());
app.use(bodyParser.urlencoded({
  extended: true
}));
app.use(cookieParser());
app.use(express.static(path.join(__dirname, 'public')));

app.use('/', routes);
app.use('/users', users);

+require('./routes/main.js');
/// catch 404 and forward to error handler
app.use(function(req, res, next) {
We are generating a parent -> child relationship between the 2 files app.js -> routes/main.js. To gain access to parent file variables from the child file we need to add this change in app.js:
mongoose.connect('mongodb://localhost/crudtest');

+var app = exports.app = express();

// view engine setup
app.set('views', path.join(__dirname, 'views'));
app.set('view engine', 'jade');
So the relationship it’s like this:
| Parent File | Included File (child) |
|---|---|
| app.js | routes/main.js |
| exports.app | module.parent.exports.app |
Now we are going to create a new page to list our persons, in routes/main.js:
var app = module.parent.exports.app;

app.get('/list', function(req, res){
    res.end('It works!');
});
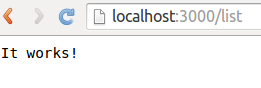
Let’s reset the web server and test the new route http://localhost:3000/list
Let’s hookup the models now into our routes/main.js, see the changes:
 var app = module.parent.exports.app;
+var Persons = require('../models/persons.js');

 app.get('/list', function(req, res){
-    res.end('It works!');
+    Persons.find({}, function(err, docs){
+        res.json(docs);
+    });
});
Notice Query#find([criteria], [callback]) is a built-in feature from Mongoose API.
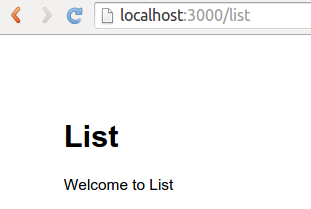
Restart the server and go to http://localhost:3000/list again:

Creating a view
Let’s change all that a little bit to display a page with an HTML table instead of a plain JSON response. First create a new template called views/list.jade based on an existing one.
$ cp views/index.jade views/list.jade
Let’s link that view to our existing route:
var app = module.parent.exports.app;
var Persons = require('../models/persons.js');

app.get('/list', function(req, res){
    Persons.find({}, function(err, docs){
-        res.json(docs);
+        res.render('list', { title: 'List', persons: docs});
    });
});
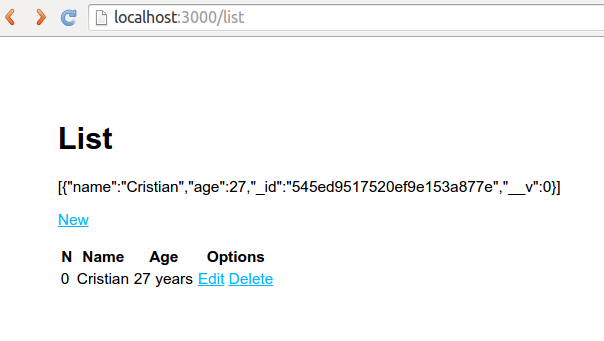
If we restart the server again, we should be able to see:
Notice that we are passing to the view an object with the list of persons. Let’s modify our views/list.jade file to display this data in table form:
extends layout

block content
  h1= title
  p=JSON.stringify(persons)
  p
    a(href="/p/new") New
  table
    tr
      th N
      th Name
      th Age
      th Options
    - persons.forEach(function(v,i){
    tr
      td=i
      td=v.name
      td #{v.age} years
      td
        a(href="/p/edit/"+v._id) Edit
        |
        a(href="/p/delete/"+v._id) Delete
    - });
Notice we already put in place some links to redirect to create, edit and delete sections.
Inserting a record
Let’s move forward with the person creation:
$ cp views/index.jade views/new.jade
Let’s add the route to link the new view. See routes/main.js:
var app = module.parent.exports.app;
var Persons = require('../models/persons.js');

app.get('/list', function(req, res){
    Persons.find({}, function(err, docs){
        res.render('list', { title: 'List', persons: docs});
    });
});
+
+app.get('/p/new', function(req, res){
+    res.render('new', { title: 'New'});
+});
And finally change the view views/new.jade:
extends layout

block content
  h1= title
  form(action='',method='post')
    div
      label(for='name') Name:
      input(type='text', name='name', id='name', placeholder='Name here...')
    div
      label(for='age') Age:
      input(type='text', name='age', id='age', placeholder='Age...')
    div
      input(type='submit', value='Save')
  style.
    form label { min-width: 80px; display: inline-block; }
    form > div { padding: 5px; }
It should look like this:
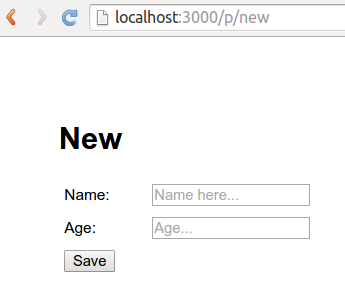
At this point we only create the GET url for displaying the form, now we need to define the POST url to receive the parameters every time the user submits the form.
Modify the routes/main.js:
var app = module.parent.exports.app;
var Persons = require('../models/persons.js');

app.get('/list', function(req, res){
    Persons.find({}, function(err, docs){
        res.render('list', { title: 'List', persons: docs});
    });
});

app.get('/p/new', function(req, res){
    res.render('new', { title: 'New'});
});

 app.post('/p/new', function(req, res){
-    res.render('new', { title: 'New'});
+    console.log(req.body);
+    var p = new Persons({ name: req.body.name, age: req.body.age });
+    p.save(function(err, doc){
+        if(!err){
+            res.redirect('/list');
+        } else {
+            res.end(err);
+        }
+    });
 });
Go to http://localhost:3000/p/new and submit a new person:

$ npm start

> express4crud@0.0.1 start /var/www/express4crud
> node ./bin/www

GET /p/new 200 254.582 ms - 662
GET /css/style.css 200 7.502 ms - 111
{ name: 'John', age: '22' }
POST /p/new 302 411.564 ms - 66
GET /list 200 286.316 ms - 978
GET /css/style.css 200 20.991 ms - 111
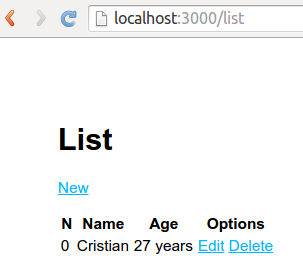
If everything works fine you’ll be redirected to /list:

Delete a record
Remember that for deleting a record we previously created a link that is passing the ObjectId of the document as parameter in the url /p/delete/:id. Let’s modify our routes file routes/main.js to add the remove url.
var app = module.parent.exports.app;
var Persons = require('../models/persons.js');

app.get('/list', function(req, res){
    Persons.find({}, function(err, docs){
        res.render('list', { title: 'List', persons: docs});
    });
});

app.get('/p/new', function(req, res){
    res.render('new', { title: 'New'});
});

app.post('/p/new', function(req, res){
    console.log(req.body);
    var p = new Persons({ name: req.body.name, age: req.body.age });
    p.save(function(err, doc){
        if(!err){
            res.redirect('/list');
        } else {
            res.end(err);
        }
    });
});
+
+app.get('/p/delete/:id', function(req, res){
+    Persons.remove({ _id: req.params.id }, function(err, doc){
+        if(!err){
+            res.redirect('/list');
+        } else {
+            res.end(err);
+        }
+    });
+});
If we go ahead and delete the previous record we created, the console output will look like this:
$ npm start

> express4crud@0.0.1 start /var/www/express4crud
> node ./bin/www

GET /list 200 545.345 ms - 581
GET /p/delete/5460d48969d6ee103e4f8c56 302 213.596 ms - 66
GET /list 200 545.345 ms - 581
GET /css/style.css 200 6.062 ms - 111
If everything works fine you’ll be redirected to /list:
Notice that in my example record John doesn’t exist anymore.
Edit a record
Editing a record will have a little bit more of complexity. Let’s start by creating a new view for it.
$ cp views/new.jade views/edit.jade
And create a fresh route, to get the document by ObjectId in ./routes/main.js:
app.get('/p/edit/:id', function(req, res){
    Persons.findOne({ _id: req.params.id }, function(err, doc){
        if(!err){
            res.render('edit', { title: 'Edit', person: doc});
        } else {
            res.end(err);
        }
    });
});
And let’s modify the view views/edit.jade to display the values:
extends layout

block content
  h1= title
  p=JSON.stringify(person)
  form(action='',method='post')
    div
      label(for='name') Name:
      input(type='text', name='name', id='name', placeholder='Name here...', value=person.name)
    div
      label(for='age') Age:
      input(type='text', name='age', id='age', placeholder='Age...', value=person.age)
    div
      input(type='submit', value='Save')
  style.
    form label { min-width: 80px; display: inline-block; }
    form > div { padding: 5px; }
At this point the Edit page should look like this:
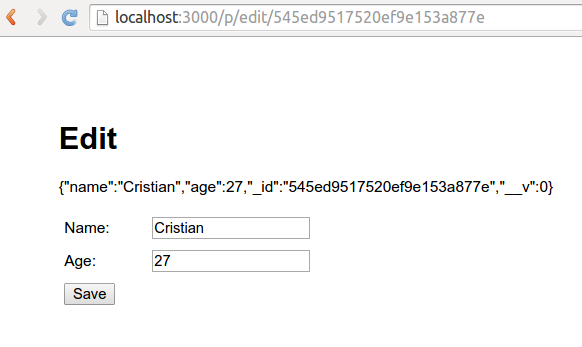
We need to create the POST url to actually modify and persist person data inside ./routes/main.js. Just add this lines:
app.post('/p/edit/:id', function(req, res){
    Persons.findOne({ _id: req.params.id }, function(err, doc){
        if(!err){
            doc.name = req.body.name;
            doc.age = req.body.age;
            doc.save(function(err, doc){
                if(!err){
                    res.redirect('/list');
                } else {
                    res.end(err);
                }
            });
        } else {
            res.end(err);
        }
    });
});
Let’s edit our existing document to increment the age from 27 to 28:
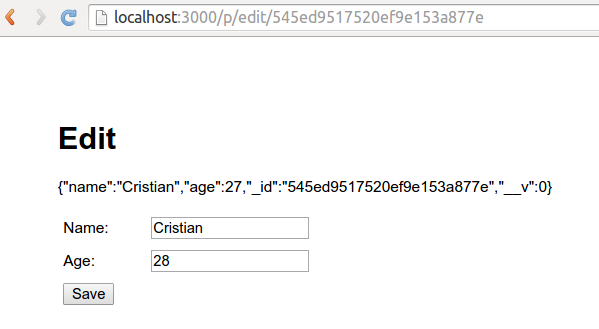
If everything works fine you’ll be redirected to /list:
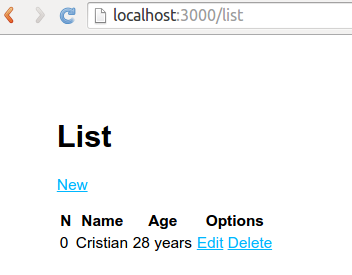
Notice our record says now 28 instead of 27.
Flash Messages
Let’s imagine that in a more complex scenario you need to implement error messages between the request. The case could be something like:
- The user edits the form (GET request /p/edit/:id)
- The user submits new data (POST request /p/edit/:id), and submits something that is not a Number into the age field.
- So instead of redirecting to
/list. We run some backend validation and show an error message indicating the problem. (GET request /p/edit/:id)
In order to resolve this problem we will need to manage session data (express-session) and be able to save and fetch those messages (connect-flash). Let’s install those packages by doing:
npm install --save express-session connect-flash
After that we’ll need to make some adjustments to our app.js.
Let’s declare our new dependecies at the very top:
var express = require('express');
var path = require('path');
var favicon = require('serve-favicon');
var logger = require('morgan');
var cookieParser = require('cookie-parser');
var bodyParser = require('body-parser');
+var session = require('express-session')
+var flash = require('connect-flash');

var routes = require('./routes/index');
And then call them around line 26, right after cookie parser usage declaration:
app.use(bodyParser.urlencoded({
 }));
 app.use(cookieParser());
 app.use(express.static(path.join(__dirname, 'public')));
+app.use(session({secret: 'supersecret', saveUninitialized: true, resave: true}));
+app.use(flash());

 app.use('/', routes);
 app.use('/users', users);
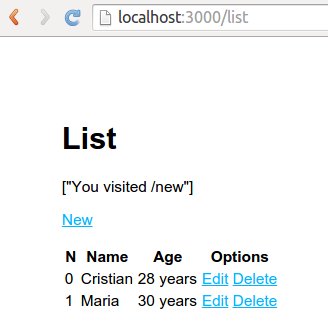
To probe our flash message system is working we can do the following. Once the user visit /p/new url and get redirect to /list we are going to display a message. In our routes file ./routes/main.js:
 app.get('/list', function(req, res){
+    var msg = req.flash('message'); // Read the flash message
     Persons.find({}, function(err, docs){
-        res.render('list', { title: 'List', persons: docs});
+        res.render('list', { title: 'List', persons: docs, flashmsg: msg}); // Pass Flash Message to the view
     });
 });

 app.get('/p/new', function(req, res){
+    req.flash('message', 'You visited /new'); // Save the flash message
     res.render('new', { title: 'New'});
 });
We also need to make some adjustment to display the saved flash message inside views/list.jade:
extends layout

 block content
   h1= title
-  //p=JSON.stringify(persons)
+  p=JSON.stringify(flashmsg)
   p
     a(href="/p/new") New
   table
If we go ahead and create a new person, when you get redirected back to /list you’ll be able to see the flash message:
Final
If you want to see the complete demo, you can go ahead and clone this repo.
$ git clone git@github.com:cortezcristian/express4crud.git
Moving Forward
During this tutorial we’ve been generating different routes with crud functionallity. It’ll be good to add an authentication layer, to prevent unauthorized visitors access our CRUD functionallity. That’ll be our next tutorial Express 4.x and Passport Auth Layer.